FastAPI & Firebase Emulator for GitHub Workflows
Ever wanted to connect your FastaAPI app with a Firebase emulator for easy to implement CI? Here's how to do it.

The Context
In the middle of a hackathon, writing endless lines of serverside code to accommodate our English learning app, I had decided to write tests to make sure our backend was reliable. Using FastAPI, I had written a few tests to make sure our endpoints were working as expected. However, I didn’t want to absolutely wreck our free tier Firestore and authentication, so I needed a better solution for testing. This was where Firebase Emulator Suite came in. Looking online, I couldn’t find a reliable guide on how to implement it with CI, so I thought I’d share how I did it. (Seriously, I googled ‘how to setup Firebase Emulator FastAPI testing 1 million times!!!)
It is VERY easy to integrate Firebase’s Emulator into GitHub’s workflows (CI), so don’t worry too much if you’re short on time!
Table of Contents
- Why Firebase Emulator Suite?
- Preqrequisites and Installation
- Starting Firebase Emulator Suite
- Connecting to Firebase Emulator Suite
- The workflow file
- Conclusion
Why Firebase Emulator Suite?
First of all, you don’t want to virtually assault your production database with tests. It’s not a good idea. You also don’t want to pay for a separate database for testing. It’s not a good idea either.
So a simple solution: use Firebase Emulator Suite. It’s free, and it’s easy to use. It’s also very easy to integrate into your CI pipeline.
Preqrequisites and Installation
Before you can install Firebase Emulator Suite, you’re going to need Node.js version 16+, and Java version 11+ installed. Once you have the prereqs done, you’re going to want to install the Firebase CLI from here.
Initialisation
Once you have it installed, you’re going to want to initialise it. To do this, cd into your directory and run the following commands:
firebase init
firebase init emulators
This will initialise the Firebase CLI and the Firebase Emulator Suite. You will be asked to select which emulators you want to use, I’ll be going with Authentication and Firestore, but pick all of the ones you’re using!
Starting Firebase Emulator Suite
To start the Firebase Emulator Suite, you’re going to want to run the following command:
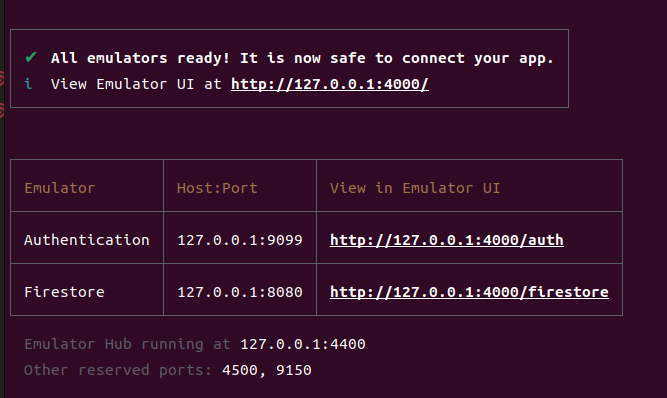
firebase emulators:startThis will start the emulator suite, and you should see something like this: 
Take note of the ports (and url) that the emulators are running on, as you’ll need them later.
Connecting to Firebase Emulator Suite
The way that firebase chooses which emulator to connect to is through environment variables. This means, all we have to do
is simply set some environment variables before we run our test command! (In this case, pytest).
In my case I used FIREBASE_AUTH_EMULATOR_HOST for auth and FIRESTORE_EMULATOR_HOST for Firestore.
Here is a full list if you’re using anything else:
- Authentication
FIREBASE_AUTH_EMULATOR_HOST
- Realtime Database
FIREBASE_DATABASE_EMULATOR_HOST
- Firestore
FIRESTORE_EMULATOR_HOST
- Cloud Storage
FIREBASE_STORAGE_EMULATOR_HOST
Cloud functions are a little more involved, see this page for further insight!
Setting Environment Variables
To do this, I wrote a bash script and ran my tests like this ./environ_emulator.sh && ./test.sh. This meant that the environment variables were set
only for the execution of the tests, and didn’t change anything for my current shell 😎
Here is the script:
#!/bin/bash

export OMNIA_ENV="emulator"
export FIREBASE_AUTH_EMULATOR_HOST="127.0.0.1:9099"
export FIRESTORE_EMULATOR_HOST="127.0.0.1:8080"
I set an extra variable OMNIA_ENV which is just to tell the server that it’s in an emulated environment.
This is because I use Pyrebase for email and password login, and it is sadly hardcoded to use the production URLs for password authentication (I believe, correct me if I’m wrong!)
If you are using Pyrebase as well for this, please be careful, and if you find a good way to integrate it let me know!!!!
Authentication Dependency Override & Pyrebase
Because of various issues relating to the Admin SDK being limited, and being unable to use Pyrebase in a testing environment, I made the following override for authentication. With this, tests would fail if it wasn’t in the emulator environment as well, so no unwanted production data touched.
def override_validate_token(x_uid: str = Header()) -> dict:
    """
    トークンをヘッダーで受け取り、検証する
    """

    user = auth.get_user(x_uid)

    return {
        "token": "fake token",
        "user": {
            "uid": user.uid,
            "email": user.email,
        },
    }

# ...

app.dependency_overrides[validate_token] = override_validate_token
Additionally, I added some environment variable checks to fail tests if they weren’t set
if "OMNIA_ENV" not in environ or environ["OMNIA_ENV"] != "emulator":
    assert False, "OMNIA_ENVが設定されていません、またはemulatorではありません"
if "FIRESTORE_EMULATOR_HOST" not in environ:
    assert False, "FIRESTORE_EMULATOR_HOSTが設定されていません"
if "FIREBASE_AUTH_EMULATOR_HOST" not in environ:
    assert False, "FIREBASE_AUTH_EMULATOR_HOSTが設定されていません"
The workflow file
name: Python lint and test

on:
  push:
    branches: [master, dev]
    paths: [".github/workflows/firebase-python-ci.yaml", "server/**"]

jobs:
  test:
    runs-on: ubuntu-latest

    steps:
      - uses: actions/checkout@v4
      - name: Set up Python 3.10
        uses: actions/setup-python@v4
        with:
          python-version: '3.10'
          cache: 'pip'

      - name: Install dependencies
        working-directory: ./server
        run: |
          python -m pip install --upgrade pip
          pip install -r requirements.txt


      - name: Install Node.js 18.x for Firebase
        uses: actions/setup-node@v2
        with:
          node-version: '18.x'

      - name: Install Java 17
        uses: actions/setup-java@v3
        with:
          java-version: '17.x'
          distribution: 'temurin'

      - name: Install Firebase CLI
        run: |
          curl -sL https://firebase.tools | bash

      - name: Cache Firebase CLI
        uses: actions/cache@v3
        with:
          path: ~/.cache/firebase
          key: ${{ runner.os }}-firebase-${{ hashFiles('**/firebase.json') }}

      - name: Run tests with pytest and Firebase Emulator
        working-directory: ./server
        env:
          # ...
          SERVICE_ACCOUNT_FILE: ${{ secrets.SERVICE_ACCOUNT }}
        run: |
          echo "$SERVICE_ACCOUNT_FILE" > service_account.json
          firebase emulators:exec './test.sh' --token "${FIREBASE_TOKEN}"
This is a very rough, but working workflow I used in the hackathon project. Here is a breakdown of what it does:
First we use the on key to say, ‘only run this workflow on pushes to master and dev if there were changes to the server or workflow file’. As we had multiple projects in the same repo for convenience, I didn’t want this to run whenever anyone made some unrelated change.
Next we run this on
ubuntu, because we are going to probably be deploying there. You should make sure it’s the environment you’re going to be deploying to as well.Our first twos steps are to install python and its dependencies. We use the action
setup-python@v4to get python and pip install. In this project I was using and deploying on Python 10, but you should change this depending on your own project.Before we can run the emulator, we must install the preqrequisites for it. Particularly Java & Node JS. This is done with the
setup-node@v2andsetup-java@v3actions. You can also look into caching here to make your workflows super fast.Then, we install the CLI with this command
curl -sL https://firebase.tools | bash.To make sure we don’t install Firebase each time, we cache it with the
cache@v3action. I believe this snippet is taken from the firebase docs if you are interested.Finally, we actually run our tests. It is important to get our GitHub secrets and set them as environment variables with the ‘env’ directive. This is especially important for your FIREBASE_TOKEN to authenticate yourself. To run our tests, we use the
firebase emulators:execcommand. This is because Firebase hogs the shell, meaning if we tried running another command after it wouldn’t happen until it closed, which defeats the purpose.
Conclusion
In conclusion, we used the Firebase Emulator Suite to create a nice local testing environment for our FastAPI & Firebase app. First we setup the firebase CLI, ran our emulator, then set our environment variables for testing. If you want to ever lookback and remember how to setup FastAPI and Firebase Emulator Suite, then please bookmark this article for future reference!
Happy hacking! 🎉